Pages

Monday, September 29, 2014

Fall Table Runner No. 2

The second table runner I made this summer was a simple coin pattern.  I have always liked the simplicity and colorful pattern of a coin quilt.  Once again I used fabrics I purchased from my friends stash.
The rich color pallet have a more modern feel in a traditional pattern.

I love the simplicity of the coin pattern.

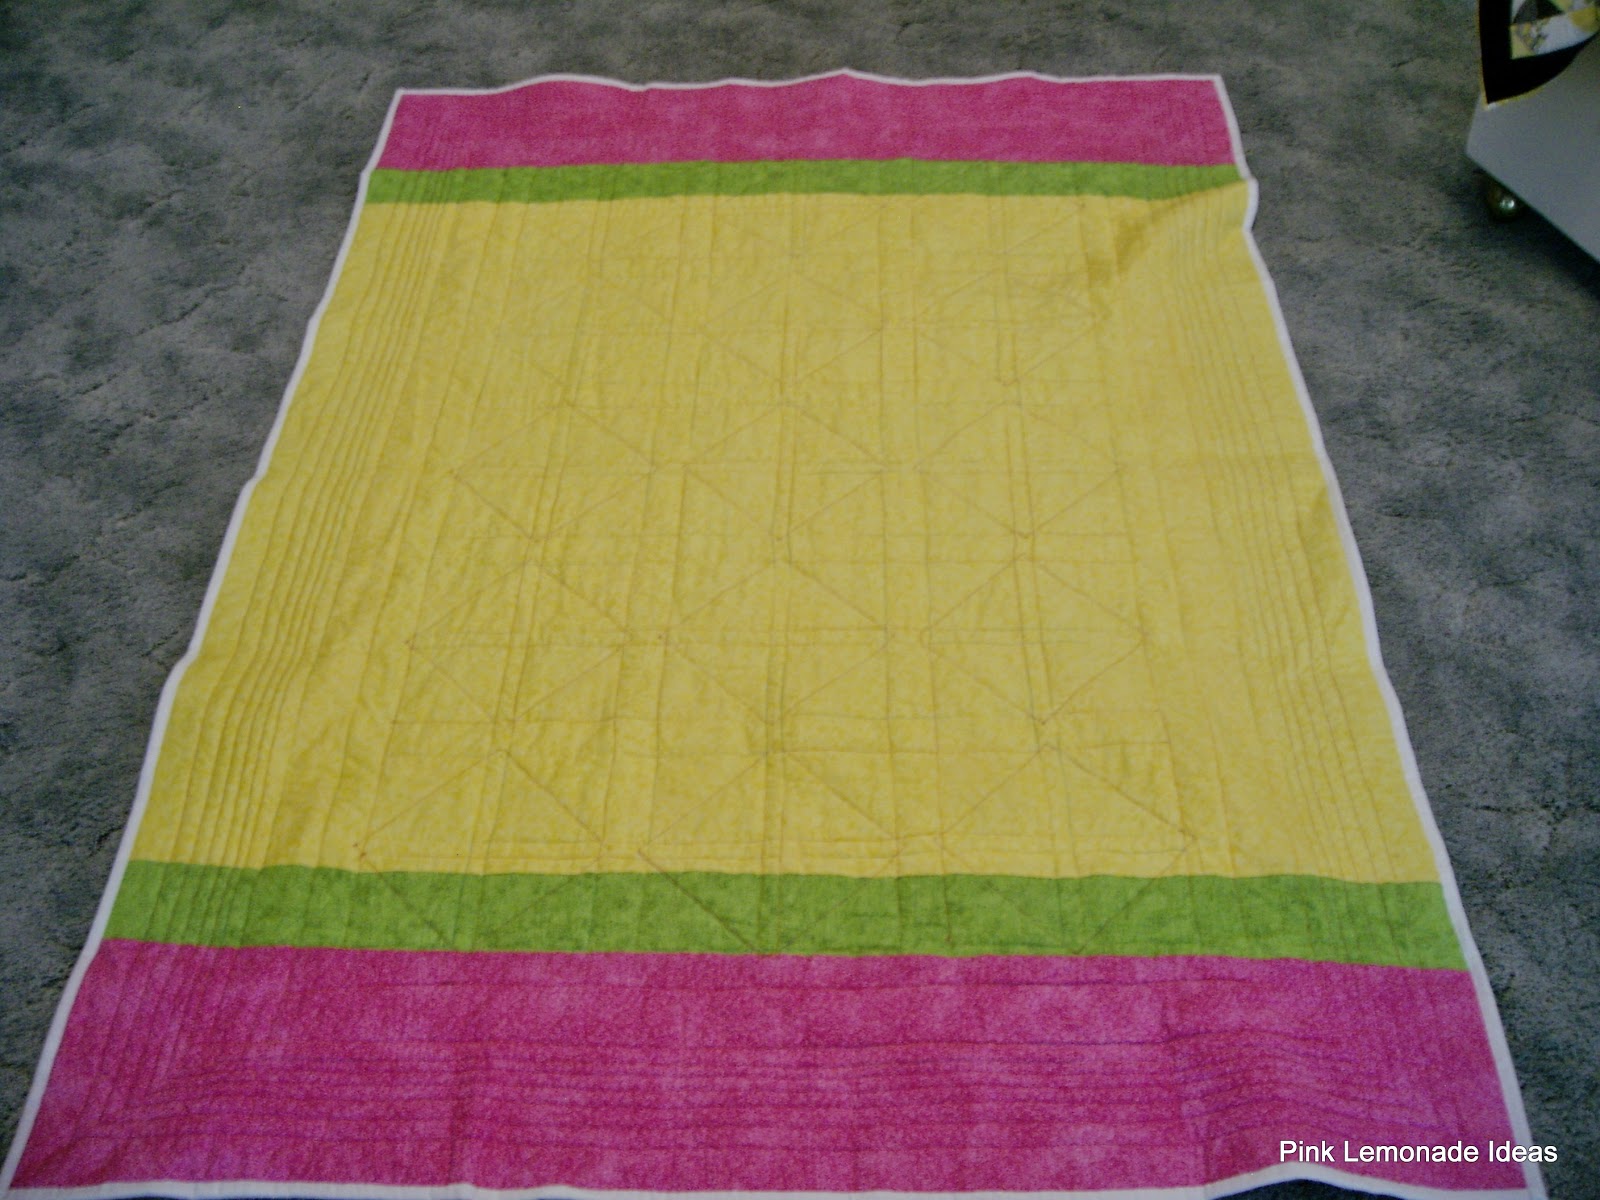
In my excitement to make these table runners I did not take too many before pictures or write anything down.  You know as you get older it is a wise idea to take pictures or make notes because your memory is not always reliable.  I believe this coin table runner started as a charm pack.  I cut the squares in half and then sewed the smaller pieces into three sections of approximately 18 pieces per section.

After you have your three sections there are several ways to set them.  I chose to strip set mine with a wide border of the same fabric.  Since I wanted the table runner to be a medium size.  It finished at approximately 19" x 38 1/2".

The rich colors of the charm pack fabrics set against the golden border turned out quite nice.  The colors and patterns of the charm pack has a little more of a modern feel which is a nice change of pace.  I am not sure if I will sell this table runner or keep it for myself.

I was curious why this pattern was called a coin pattern so I did some research.  Here is what I found:

This site Quilting in America has a good sample of various traditional quilt patterns and a little about their origin.  I found several sites that talked about the origin of the coin quilt pattern.  There were different opinions about whether the Amish Bar pattern or the Chinese Coin pattern came first.  Overall most people seem to think the coin pattern represents a stack of coins.  Some patterns call for all the coins to be the same height and some call for various heights.  I made mine all the same.

Like most historical quilt patterns there are several variations, names and sources of origins for the Coin pattern.  This is one of the fascinating aspects of quilting.  With each quilt comes a sense of uniqueness to the maker.  Seldom are two quilts exactly the same.  What will your version of the Coin quilt pattern look like?  I would love to have comments and pictures posted below for all to marvel and share our unique versions.

Danna


Friday, September 26, 2014

Fall Table Runners

Over the summer I was busy working on some quilting projects and I made several fall table runners.  I am not usually drawn to the fall colors.  I prefer the summer and spring color pallets.  But I thought I would try to expand my horizons and when a friend was cleaning out her stash I snagged some beautiful fall fabric.

The first one is a simple pattern based on the size of the squares my friend had already cut out.  I added the end piece to create a rectangle block and then alternated where the end piece was to create a staggered look.  I then added a few borders and I was done.  The really exciting factor in this table runner is the quilting.  I have been working on my free motion quilting and have done mostly meandering type quilting.  I have this down pretty well so I wanted to branch out a bit.

The light colored squares are the ones my friend had precut.

I added the leaf patterned piece to each block the create the rectangular block.

It is simply yet very striking at the same time.
 
I found online several patterns that were in a fall theme.  I chose the meandering leaves to put on this table runner.  I printed out the pattern and pinned it to the runner.  I then stitched through the paper to get the feel of how the pattern flowed.  Then I just kept stitching.  Using the paper was an easy way to get started and I was able to continue without the paper on the rest of the table runner.  I was pleased with the results.
 
These are the sheets I printed.  I did enlarge one to see if it would be easier to master.

Once I finished stitching on the paper it was easy to tear away.

The finished result, not half bad for a first try.
 
Since the table runner has a large border I wanted to incorporate some additional free motion quilting in the border.  I first searched for an acorn free motion pattern but was unable to find one that I felt I could manage easily.  While searching I came across an article that talked about writing in cursive letters in quilting.  That sparked the idea of writing several words in a continuous pattern along the border.  I selected the words: fall, leaves, pumpkins and acorns.  I started at the end of the longest side and started spelling out my words.  This was really easy since I was not overly concerned if the words were all exactly in a straight line.  In between each word I put a little loop and some space to separate them.  When I came to the next edge I continued my loop and space around the corner and then began my words again.


Writing in the cursive letters was fairly easy.

Hopefully you can see the word fall.
 
The quilting on this runner is not 100% accurate but for a first try I was please with the results.  The next time you have a wide border and are feeling rather adventurous try spelling out your favorite phrase or words in thread.
 
Danna

Wednesday, September 24, 2014

Vinyl Cups - A Gift to Share

This summer our quilt group was blessed with the opportunity to help prepare a young lady for college dorm life.  A member of our group had a girl living with her family this summer as the girl's family prepared to enter the mission field.  During that time it was brought to our attention that this girl was in need of a few items for her upcoming dorm room in college.  Our group jumped at the chance to bless this young woman with an abundance of necessary and fun items for her dorm.

My Mom, daughter and I prepared a large bowl and filled it with various items for her room.  We added some necessities like washcloths, sharpies, pens, spiral notebooks etc.  But we also included some just for fun items.

This is the bowl overflowing with all the fun things we prepared.
 
I like the way clear plastic makes anything look more festive.

The most exciting fun item was a personalized cup made with stick on vinyl.  I had several of the cups in the closet so we pulled them out and began to transform them.  I have a Cricut machine that a friend blessed me with but have not used it very much.  This project was a great way to practice some new Cricut ideas.

Here are the cups we made:

The clear one was for the young lady moving into the dorm.
 
The supplies needed for this project are:
 
Clear Plastic Cup (I used the insulated cups with lids from the Dollar Tree)
Sticky Plastic Vinyl (You can buy the expensive rolls in the Cricut section or look in the regular scrapbook/craft section for the sheets.  Mine cost 1/3 the cost of the roll)
Die cut machine and designs or punches and scissors
Clear Contact paper (to transfer the design)

Here is how the cups started.

These vinyl sheets are in the scrapbooking and crafts section.  They are a lot cheaper than the rolled vinyl.

Here is a close up of the vinyl tag.  I purchased mine at JoAnn's.
 
Clean your plastic cup with soap and water.  Make sure it is completely dry before applying the vinyl.  Next select your design and cut it out.  If you do not have a die cutting machine you can use punches, or trace a design on the vinyl and cut it out with scissors.  I wanted each of my cups to have a monogram and an additional design for the back.  But the designs are limitless.

This was really fun looking and thought it was a great reminder.
 
The cup with the D was for my daughter and she wanted a heart and star.

The open design of the butterfly will change based on what liquid is in the cup.
 
Once you have cut your designs there is a simple way to apply it to the cup.  I used the clear contact method.  I cut a piece of clear contact paper slightly larger than my design.  I then placed the contact paper over the design and peeled it away from the backing paper.  This will temporarily adhere your design to the contact paper.  Then place your design in the correct spot and rub all over your design making sure to really secure the edges.  Then simply peel off the contact paper and the vinyl sticks to the cups.  This method of transfer worked really well on the curved cups.

The cups need to be hand washed.  I have not tried one in the dishwasher but I feel like it would make the vinyl peel up.  Also the insulated cups do not work well in the dishwasher.  You can use this method on any cup, plastic or glass.  It is a fun way to create a functional and really fun gift. 

The lady who the girl was staying with also had a daughter who was college bound.  I made her a cup for her dorm room also.
 
There are lots of fun things you can do with the sticky vinyl.  So the next time you are browsing the craft isles pick some up and have fun.
 
Danna


Monday, September 22, 2014

Quilting Design Boards

You know how sometimes you see an idea on Pinterest or a blog and you think, "I should try that", you do and it doesn't exactly turn out the best?  Well this project was just that way.  I saw these design boards and they were really cute and functional.  They looked like they would be easy to make.
The finished board.

I started my boards with a piece of foam core, the kind you use when your kids are making a project display for school.  I layered my batting on top of the foam core and glued it down with craft glue.  This part of the process was not bad.  The boards were then ready for the trim around the edge which is what makes them "cute".

Polyester batting glued to the foam core board.
 
 My thought was that if I made a regular quilt binding that I would be able to glue it over the edge and it would be finished on both sides. 
 
I cut regular quilt binding to go around the edge of my board. 
 
I used tacky craft glue to adhere the binding to the back of the board.

I made my corners just like a quilt binding.

The corner on the back side.
 
The gluing of the binding on the front side proved to be very troublesome.  First I tried craft glue but it does not set up quick enough to hold the binding in place.  Next I tried hot glue.  This worked but it was very difficult not to burn my fingers or melt the batting.
 
I was able to finish three boards and I put them in our quilt closet for members to use.  I had four boards prepared but tossed one in the trash I was so frustrated.  This would not be a project I would repeat the same way.  It proved to be way to time consuming.  There might be a better way to create a "cute" design board but I will put that on the back burner for now.  This will require some additional Pink Lemonade Idea design time.
 
Danna


Saturday, September 20, 2014

Bright Lights Quilt

As I have stated in several previous posts I love the Missouri Star Quilting Youtube videos.  She has such wonderful patterns and ideas. And Jenny is so entertaining to watch, her enthusiasm is contagious and you want to jump right into your next project.

This quilt is made from one of the Missouri Star Quilting videos Amazing Jelly Roll Quilt.  It was really easy to put together and using the really bright colors made it even more exciting.

The prints are from a jellyroll.

I pieced the back to use up the scraps and make it more interesting.
 

The strip method Jen demonstrates in the video is easy to assemble.  I used a lattice stripping between my blocks because the fabrics were so busy.  This allowed the blocks to be set apart and softened the look slightly.  I will definitely do this pattern again. 

If you have not seen any of the Missouri Star Quilting videos be sure to check them out.  They are fun and you will walk away with a ton of ideas.

Danna

Friday, September 19, 2014

New Storage Always a Plus!

This summer during one of our garage sale treasure hunts my husband and I found a great plastic drawer storage unit.  It is one of the large heavy duty units and we only paid $2.00 for it.  I wasn't sure exactly where I was going to use it but for $2.00 I could not pass on such a great deal.  My fist thought was I would combine some smaller units we have in my husband's area of our shop.  But once it made it home I quickly tossed out that idea for a better use in my area.

The drawer unit was the perfect size to fit at the end of my crafting counter.  Placing it on the end allows it to block off the end of the counter so you cannot see the mess (I mean projects in progress) on the rest of the counter.  I love it.  Covering up your messiness is always a positive.

The outside casing for the drawers is white.  Well, it was once a bright white now it is more of an ecru color.  It did have a few rust stains on the top where it looked like a can had been left.  But, a little baking soda to the rescue and it really cleaned up nicely.

The unit has some large drawers which is much more functional than only having the small drawers.

The rust stains on the top.

Dry baking soda.  The trick is to only us a small amount of water.

Stains all gone!
 

If you are not aware of the magical cleaning powers of ordinary baking soda you are missing out on an extraordinary product.  I have found that baking soda will remove almost any kind of stain or baked on yuk from most things.  Do not use it on painted surfaces because it can remove the paint.  But on any non porous hard surface it works wonders.  Now back to the storage unit.  I was able to remove the rust stains and it brightened up the plastic slightly.

The position I placed the drawers on my counter meant that the back of the unit was facing out.  It does not have a solid back so I covered the back with a piece of poster board covered with black and white contact paper.  The contact paper coordinates with my color scheme really well and I had it in the closet. 

The open back was not attractive.

The poster board cut to fit the back.

I have had the black and white contact paper for a while in my closet.

The finished back of the drawer unit.  Much better!
 
The next step was probably one of the most important steps, labeling the drawers.  I do not like to take the time to search for something when I am in my creative process  Although I seem to be constantly looking for something.  I am trying to get myself well organized so I can spend more time creating and less time searching for my supplies.  Maybe someday I will finally achieve that goal.  Once I decided what items would go in each drawer I then used my label maker to label the drawers.
 
Labeling is a must!

My label maker has borders so all of the labels in my craft/sewing area has the flower border.
 

One last addition and the drawers were fully functional.  After knocking the drawer unit off the counter onto the floor I added some shelf liner underneath to give it some grip.  Yes, after I filled all the drawers I caught the end one day with a book and it went sailing off onto the floor.  Thankfully nothing broke and I knew what would keep it in place.  Gripping shelf liner might just be as magical as baking soda.  It will keep almost anything in place.  Since adding the shelf liner the drawer unit has stayed in place.
 
I use my new drawer unit every day and I love the feeling of being somewhat organized.  Hopefully you can find the perfect storage accessory for your crafting and sewing area.  Don't pass it up at a garage sale just because it has a few stains.  Remember the magic of baking soda and a little elbow grease.
 
Danna


Wednesday, September 17, 2014

Finished the Last Few Projects - Planter Redo

You know how when you redo a room you are going along strong and then you get close to finishing the project and you totally run out of energy?  That is the scenario I have in my master bathroom.  Several years ago we redid our master bathroom.  We kept the same wall color but we painted the cabinets black, took off some doors to the upper cabinets and changed the theme of the room.

The overall project turned out great.  But there were a few projects I told myself I would get to later.  Well now, three years later I am finally getting around to them.  The first on my list was to repaint a metal planter that holds the silk ivy and sits on top of the upper cabinets.

Below is a picture of the before color.  It was your basic terra cotta color which is nice but did not coordinate with my black and pink color scheme.  I painted the base black and it made a huge difference in the appearance of the planter. 

See the terra cotta color. 

I used a grey primer coat since I was limited on the amount of black paint I had.

Here is the planter painted black.
 

The planter had some really nice raised embossing on the sides I have always wanted to highlight.  So I took some silver paint and brushed on a light dry coat.  By painting the silver on with a dry brush it really brought out the details of the embossing.

The raised embossing before I added the silver highlight. 

The embossing with the silver added.
 
You can now see the raised embossing on the planter.  I love the way it turned out.
 

The planter now looks like it belongs in the room.  I have a couple of other projects in this room I need to finish.  I am hoping they will not take another three years to complete.

Danna

Monday, September 15, 2014

Suitcase Revival

As you have probably figured out by now one of my favorite past times is to go to garage sales.  I love the thrill of the hunt for that hidden treasure and the unknown of what is in the bottom of the 25 cent box.  I carry with me a list of items I am searching for that will complete my arsenal for numerous crafting and sewing ideas.  Recently my husband and I were out on our treasure hunts and came across on old cosmetics suitcase.

The suitcase had definitely seen better days but beneath the rough exterior I saw the potential of a new revival.  The case was a medium brown and had some of the edging broken off.  My husband was a little bit skeptical about the possibility of the case being reborn.

I had several ideas floating around in my head of what the "new" case would look like and it took me a few weeks to figure out which one would work best.  I finally settled on using an old dictionary and Mod Podge to cover the case.  This would allow me to cover the broken edging pieces with the dictionary pages and you would not know they were missing.

The case in it's original form. 

The broken edges I needed to cover.

The inside of the case just needed a coat of paint to spruce it up.


The process of applying the dictionary pages is rather simple.  You tear your pages into smaller pieces and then apply the Mod Podge type glue.  I used a simple recipe of half school glue and half water.  Since the case was a larger project I did not want to use up all of my Mod Podge.  The watered down school glue works just as well.  When I had covered the whole suitcase with the pages I then did a final coat of the Mod Podge followed by two coats of polyurethane sealer.

Here are the steps I follows to revive my suitcase:

I first spray painted the hardware, edge stitching and the inside of the case black.  Since my pages were black and white I thought this would make the hardware etc. stand out.

There was no reason to paint the portions of the case that would be covered with the pages.
 

The handle I painted with black fingernail polish and sealed with a coat of clear polish.  I felt this would adhere better since the handle was plastic.
 

Next I started applying my dictionary pages.  I tore the pages into random sizes and applied the glue mixture to the back of each piece.  You do have a few minutes when you first apply the paper to move it around and get it in the perfect location.  For the edges around the stitching I wanted a clean line so I cut the edge of the paper that was up against the stitching.  This gives the effect of a clean edge and looks better.  The pages are not all straight but I did try to make the words on the pages go in the same direction.  Meaning I did not turn an of my pages upside down.  You could turn the pages any which way and it would give you a more random effect.

I mixed half water and half glue for my Mod Podge variation.

This was an old dictionary we had around the house.  It was one of three.

I loved the size and style of the type.

The bottom of my case is where I started.  This allowed me to perfect my technique on an area that would not show.

The first stage of my case is complete.
 

It took several hours to completely cover the suitcase.  I wanted to add just a small amount of color to the case.  A hint of color makes the black and white of the paper really striking.  In order to add the color I selected different pictures of various objects from the dictionary and colored them with colored pencils.  Using the colored pencils gave me the hint of color without saturating the drawings.  It is kind of like coloring the maps we did when I was in school.  I then randomly placed the pictures on various locations around the case.

The fish I colored so it looked like a catfish.

I liked all of the diagram labels on the fish drawing.
 

The Revived Suitcase!
 
The case revival turned out better than I anticipated.  I am pleased with the transformation and plan to use the case as a display at my next craft fair.  It will work well to fill with my handmade jewelry.  My daughter ask me what I would do if someone wanted to buy the case.  I told her most likely I would sell it, but you never know.  Some treasures you just can't let go of.

Danna